Dec 28, 2009

iShootTurkey Pro v1.0 (iPhone)


DESCRIPTION
Turkey Swarm is coming!

Look at all turkeys flying around the screen, and how exciting it will be to shoot all of them down to the ground! On the basis of common version that the turkey fly to left and right, many new gameplay elements are added on the professional version, such as the oncoming turkey, the balloons that will distract your concentration and the punishment of score decrease etc.

Following are gameplay skills:
- You must beat down the oncoming turkey, or your scores will decrease if it bumps the screen.
- For all the coming turkey, there will be sounds to hint you.
- Don't beat the ballon, or you will lose scores.
- Try your best to doublekill and even triplekill all at once, in which way you'll get extra bonus as encouragement.


LANGUAGE
- English

REQUIREMENTS
- Compatible with iPhone and iPod touch (2nd generation)
- Requires iPhone OS 2.2 or later


Ten Squared (iPhone)


Fill up the square's boxes without getting stuck!

Ten squared is a logic game, a great brain teaser for your iPhone and iPod touch!
The goal of the game is to fill the squared grid complying with a rule. You can choose between two different rules, knight or bridge: starting from any box of the grid, you must find the path that enables you to fill all boxes. When you complete the starting 5x5 grid you unlock the 6x6 one, and so on up to the 10x10.

You won't be able to stop playing!

FEATURES
- two different game modes: 'bridge move' mode and 'knight move' mode
- six progressive game levels (from 5x5 to 10x10), up to 12 schemes to solve
- autosave, not to lose a single move
- game soundtrack
- choice of the tracks from iPod library to listen music while playing
- preference pane
- rubber to delete moves and change path
- hint function for next move
- easy mode with partially solved squares
- top ten with best results
- shake to restart the game
- OpenFeint enabled

Good reasons to play Ten Squared found by touchArcade forum members:
* "makes your brain hurt so good" (mezdup)
* "if you don't have it your iPhone might as well be an expensive paperweight" (Broski)
* "it is the answer to the Ultimate Question of Life, the Universe, and Everything" (djflippy)
New in this version - Soundtrack and sound effects are now enabled by default

LANGUAGE
- English

REQUIREMENTS
- Compatible with iPhone and iPod touch
- Requires iPhone OS 3.0 or later

ANDROID APPS and GAMES


Paid & Free Android Games and Applications!

Just like some apps will not run on Vista that runs on XP.
Droid apps are the same way.

If you have a MyTouch 3G most all of these will run on it.

Most should run on G1 and Droid...;-)

Part 1 Part 2 Part 3

PC World - January 2010


PC WORLD is the best-selling monthly computer magazine in America with over 6.2 million readers devoted to personal computing and related technology. Our award-winning editors deliver the Top 100 PC and product rankings and reviews from our state-of-the-art Test Center. Each issue is loaded with in-depth special reports and authoritative news stories, how-to's and tips, new PC trends, technologies, the Internet, and more. PC WORLD is an essential tool for any computer user.

Download

Dec 26, 2009

iPhone Tips and Tricks

Many of us may think that iPhone is very beautiful and powerful. However, how many of us have actually used its full potential? Do you know all of the tips and tricks of your iPhone? If you don’t, I am sure the following Ultimate List of iPhone Tips and Tricks will help you a lot.

1) Get URL Hints
In Safari, you can press and hold any links in order to see the URL and site name of the link.


2) Dismiss Keyboard Suggested Word
To dismiss the keyboard suggested spelling of a word, you can tap on anywhere of the screen. You do not have to press “x” button at the end of the word.

3) Scroll to the Top of the Page
When you are using iPhone applications, you can automatically scroll to the top of the page by tapping on the “top bar”, which has the time, service bars and the battery information. In Safari, this will also brings up the URL address bar as well.


4) Different Domain Suffix
Hold down the “.com” button, you can see a popup comes up with “.net, .edu and .org” buttons. Slide your finger from them and then release your finger to choose.

5) Domain Resolution
When typing a URL in Safari, you don’t have to type the “www” or the “.com”. For exmaple, you can type “iPhoneToolbox” in the URL box in order to view “iPhoneToolbox.com”.


6) Take Screenshots Anytime
You can take any screenshots at anytime easily on your iPhone. First of all, press and hold the “Home” button and then click the “Sleep” button once. The screen will flash white and the screenshot will be stored in your camera roll immediately.

7) Save Images in Safari
When you are browsing any web pages on Safari. You simply touch the image and hold your finger until a menu show up, select Save Image.The downloaded image is located under your Photo / Camera Roll.


8 ) Inserting a Period
When you are typing on you iPhone, simply double tapping the “Space Bar” button at the end of a sentence, it will automatically insert a period followed by a space. It saves you a lot of time instead of pressing “124″ to get the numbers and symbols page where the period located in.

9) Alternative Way to Navigate Screens
You can tab the bottom right or left corner to switch between different screens instead of swiping your finger across the screen.

10) Alternate Characters
Hold down a letter on the keyboard, you can see popup comes up with various versions of the character.


11) Move Dock Icons
Just press and hold any icons on the screen, then drag them while they are shaking. You can put any 4 icons on your dock (grey bar at the bottom of your iPhone).


12) Fit-to-page Column, word and Picture
When browsing web pages on Safari, you can double tap on a column, word or picture to fit it’s width to your iPhone’s screen.

13) Select Icon for Bookmarked Webpage
When you are browsing a web page on Safari and add its icon to your home screen by pressing the “+” button and select “Add to Home Screen”. The icon is a screenshot of the page you were on. You can have a different icon by zooming in a particular item on the page. It can be the website’s logo or any picture.


14) Scrolling with Two Fingers
Some web pages contains separate text boxes with their own scroll bars. If you are trying to move around in one, you can scroll it with two fingers instead of one. That will let you scroll just inside the box and not affect the position of the entire page.

15) Maximize Battery Life
There is a separate sensor situated right above the earpiece, that detects ambient light. The iPhone uses this sensor only once per session, just as you unlock the handset. But if you cover the sensor as you unlock the phone, you will trikc the handset into thinking it’s in a dark room, and it will power down the screen brightness. You can Also turn off Bluetooth and WiFi if you don’t expect to use them for a while. You can also set email fetch time to “Hourly” or “Manually”, and turn the “Push” off in order to save energy.

16) Reset Your iPhone
Press and hold the “Home” Button and the “Sleep” Button to Reset your iPhone. A white light will flash, the screen will shut off and then turn back on. Please keep holding both buttons until the screen turns back on.

17) Insert Punctuation Quickly
To enter any punctuations while using iPhone keyboard, you can press and hold the “123″ button and slide your finger over to any punctuation button. And then the punctuation will be inserted after you have released the button.

18) Get a Bigger Keyboard
When you are using the on-screen keyboard on Safari, you can rotate the iPhone horizontally before tapping on the address bar, the Safari window will switch to horizontal mode. Now you can have a much larger keyboard, making data entry a little easier.


19) Changing iPod Icons
By the default, the buttons at the bottom of the iPod scren are “Playlists”, “Artists”, “Songs”, “Videos”, and “More”. You can change them by pressing the “More” button, and then tap on the “Edit” button in the upper left corner. A Configure screen will appear with icons for “Albums”, “Podcasts”, “Audiobooks”, “Genres”, “Composers”, “Compilations”, “Playlists”, “Artists”, “Songs”, and “Videos”. To substitute one of these icons for one that appears at the bottom of the iPod screen, just tap and hold on the icon you prefer and drag it over the icon you want to replace. Tap on Done when you’re finished.


20) Make a Call from Safari
If you find any phone numbers in Safari you would like to call, you do not need to jump to the phone component. Just tap on the number, and the iPhone will dial it for you immediately.

Dec 25, 2009

Beginners Guide: Install PHP 5, MySQL 5 on Apache 2.2 on Windows with screenshots!

This guide is intended for beginners who wanted to install PHP 5 and MySQL Community version 5 and make it work with Apache 2.2 . Installation will be done locally, so that you can test web application such as Wordpress before going live. This is quite a long guide so prepare yourselves for a ride!

Install PHP 5 on Windows
1- Download the latest Windows PHP Binaries (MSI file) from this page. I choose the eZNetworking mirror because it is the closest one to Malaysia. Choose a mirror that is nearer to your country for a faster file download. The latest PHP version that I downloaded is 5.2.4. Save the file to your Desktop.


2- Right click on the file and click “Install“.


3- Click “Next ” once the Welcome page is displayed.


4- Select “I accept the license agreement” and click “Next “.


5- Change your PHP installation path OR just accept the default path - C:\Program Files\PHP\ and click “Next “.


6- On the Web Server Setup screen, select the Apache 2.2.x Module and click “Next “.


7-On the Apache Configuration Directory screen, browse for the Apache configuration directory (conf) OR just enter C:\Program Files\Apache Software Foundation\Apache2.2\conf\ and click “Next ” to proceed with the installation.


8- For now, accept the default selection and click “Next”.


9-Click “Install ” to install PHP 5 on Windows.
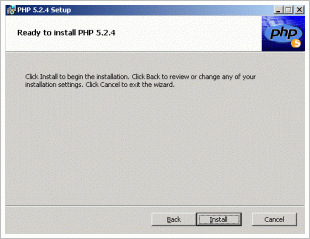


10- Click “Finish ” once completed. PHP 5 is successfully installed.


11- Start your Apache 2.2 server using the “Monitor Apache Servers” console (Start -> Apache HTTP Servers 2.2.4 -> Monitor Apache Servers ). You can see that PHP was successfully installed by checking the Apache status at the bottom of the console.


Test your PHP 5 Installation
1- Open up your Windows Notepad. Type in “” inside the file. Save this file as “info.php” inside your Apache root directory, C:\Program Files\Apache Software Foundation\Apache2.2\htdocs .


2- Open up your web browser. In the address bar, type in your web server domain name plus info.php as the file name. Example: http://www.syahid.com/info.php . You should get a PHP configuration page just like the one below.


Congratulations! You have successfully installed and test PHP 5 on Windows!

Tell Apache 2.2.x to Support PHP Index File
What happens if you change your index.html (default web server homepage) to index.php and try to access your homepage? Apache will not recognize it and you won’t see anything displayed on the page. To make sure Apache recognizes index.php as a default homepage too, follow the instructions below.

1- Rename your index.html to index1.html and info.php to index.php (for testing purposes only!).


2- Edit your Apache configuration file, C:\Program Files\Apache Software Foundation\Apache2.2\conf\httpd.conf by opening it with Windows Notepad.

3- Find a line that starts with “DirectoryIndex index.html…“. Add index.php at the end of the line . Save the file and restart your Apache Server from the “Monitor Apache Servers” console.


4- Load your Internet browser again. Type in your web server address e.g http://www.syahid.com. You should get a page similar to the info.php page above. Index.php now is recognized as a default Apache homepage, just like your normal index.html page.


Install MySQL 5.0 Community Edition on Windows
1- Download MySQL 5.0 Community Edition to your Desktop from here. If you want to download from a different mirror, click here. Make sure you always download the “Complete package “. Current version during this post was written is 5.0.45.

2- Unzip mysql-5.0.45-win32.zip (the downloaded mysql file) to get Setup.exe. Double click Setup.exe to start installing MySQL. Click “Next ” when you are prompted as below.


3- Select “Typical” for Setup Type and click “Next ” again.


4- Click “Install ” to proceed with the installation process.


5- The setup activity will show you some advertisement. Read it if you wish and click “Next “.


6- Tick “Configure the MySQL Server now” and click “Next ” two times.


7- Click “Standard Configuration” to ease installation process and click “Next ” again.


8- Tick “Install As Windows Service” to make MySQL auto-startup with Windows and “Include Bin Directory in Windows PATH ” to make MySQL system files automatically available for other application.


9- Tick “Modify Security Settings” and enter a root (Administrator) password to secure your MySQL installation. Don’t skip this step! Click “Next ” again.


10- Click “Execute” to start the MySQL Configuration process. Once finished, click “Finish ” to end configuration

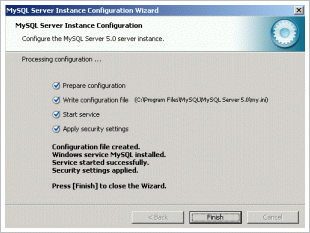


11- Make sure MySQL runs automatically after installation. You can check the status from Administrative Tools Services snap in (Start -> Programs -> Administrative Tools -> Services ), also available via Control Panel.


12- (OPTIONAL) Open your DOS command prompt (Run -> cud). Type in “net stat -na“. Check out ports opened by MySQL (3306) and Apache (80) . That means the services are up and running.


13- (OPTIONAL) Run some of MySQL commands to further ensure that the installation is a success. Check out and follow the commands as pictured below. User account is root and password depends on what you have entered previously during your MySQL configuration.


14- IMPORTANT: Reboot your machine! This is to ensure all MySQL system files are rss-read by Windows as environment variables.

Configure PHP 5 to Work with MySQL with MySQL PHP Extension
Previously, we have installed PHP with minimal modules / extension. To add MySQL support to PHP, you need to change your PHP installation - by adding the MySQL extension on top of your PHP installation. Please make sure that your original PHP 5 MSI installer still remains at its original place .

1- Open the Add / Remove Programs console via Windows Control Panel. Find the PHP 5.x.x entry and click “Change “.


2- Click “Next ” once you are prompted the Welcome page.


3- Click the “Change ” button to proceed.


4- Select Apache 2.2.x as shown in the picture below. Click “Next ” once again.


5- Select your Apache configuration directory (conf) - the directory where your httpd.conf resides. Click “Next ” once done.


6- On the “Choose items to install” screen, click on the plus (+) icon next to Extensions to expand the list.


7- Select on the “X” next to “MySQL” and select “Entire feature will be installed on local hard drive”. Click “Next” again.


8- Click the “Change” button to save all the PHP configuration changes.
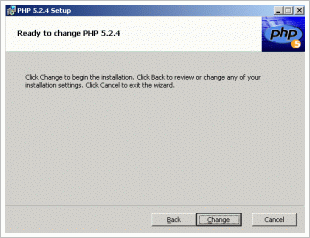


9- Finally, restart your Apache 2.2 web server! You can check out that the MySQL extension support for PHP was successfully installed by checking out the info.php / index.php page that was created before.


Congratulations! Give yourself a pat on the back to finally manage it here. Now you can run almost many web applications that depends on Apache 2.2, PHP 5 with MySQL 5 database support. If any of those app complain about any missing extensions, remember that you can always reconfigure PHP by following the steps above.


Whew! This is quite a long guide but I really hope that someone out there will benefit from it!